Introduction to Schoology:
A learning management system allows you to run your classroom while managing administrative tasks such as taking attendance, inputting, and recording grades. Choosing a learning management system is tough. Beginning in September 2020, our district began requiring teachers to use Schoology.
Getting to Know the Schoology Platform:
When logging into Schoology, your home page may look like this. Along the top, you will see the Schoology logo. Whenever you click on it, it will take you to this screen.
Courses:
Clicking this button will take you to a page that lists all your courses, also known as the Course Dashboard. Here, you can click on any of the icons to access the course you want to view.
Courses are normally populated for you by your district.
The icons for the courses can be changed. You can choose one of Schoology’s limited layouts or create your own.
Groups:
Groups are different from courses in that they are created to allow for professional development, communication, collaboration, and resource sharing. Teachers can create a group for class parents, clubs, or a collegial circle.
There are also groups already formed on Schoology. One that you might be interested in joining as a newbie is Schoology Educators. To join a group:
- Click on “Groups” along the top bar.
- To the far right, click on “My Groups”
- There you have the ability to join a group with either an access code or by searching school or public groups.
- Or, you can create a group and invite others to join in.
Resources:
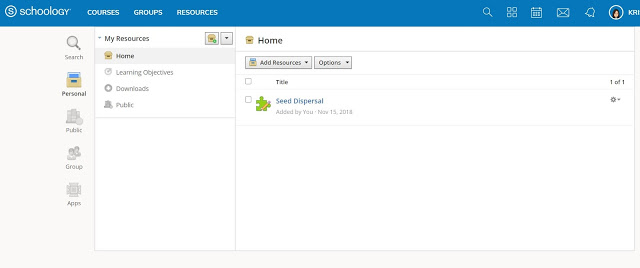
This is an area that holds all your teacher stuff. Think of it as your virtual filing cabinet. All folders and materials you use to teach are housed here in one easy spot. This area has unlimited storage, so that is one worry off your mind!
There are three areas that you will want to familiarize yourself with within Schoology’s resource area.
- Left-side Navigation bar: This allows you to toggle between your
- Personal resources: Ones that you create or upload into Schoology.
- Public resources: Ones that are available to everyone.
- Group resources: Ones that are shared in one of the groups you belong to.
- My Resources: Your personal or shared collection of resources.
- Home: This is your working area, where you can search for materials depending upon which resource tab you are in.
- For example, if you are in public resources, you can search for a particular resource you may need.
- In personal resources, you can create your assignments or upload them from elsewhere on your computer.
Profile:
Who doesn’t love creating their profile? Here, you can personalize your experience. You can add a photo (I like to use my Bitmoji) and play around with the settings by clicking on your name to the far right. You will see a drop-down menu that includes:
- Your profile
- Your school page
- Settings
- Subscriptions
- Log Out
In your profile, you will see options to:
- Add a picture – Click and upload a picture on your computer or choose from one of Schoology’s limited avatars
- Add interests and activities
- Write a bio – could include teaching background, certifications, and achievements.
- Include updates – only those who have access to your profile page will get the updates (depending on how your district sets this up)
- Write a blog – This is meant for you to use (if you choose – I don’t) as a personal blog to write about educational topics.
- Create a portfolio – (Only available for Enterprise members) – You can create, view, and share personal portfolios.
- Connections – other members of your community
These are basic functions of Schoology. Follow my posts to learn more. Have you scheduled an assignment to Schoology yet? Learn how here.
What else would you like to learn about Schoology? Let me know in the comments.
Get Digital!
Subscribe to get weekly tips and ideas to use in your classroom.

